Homemade Twix Cups | From Scratch

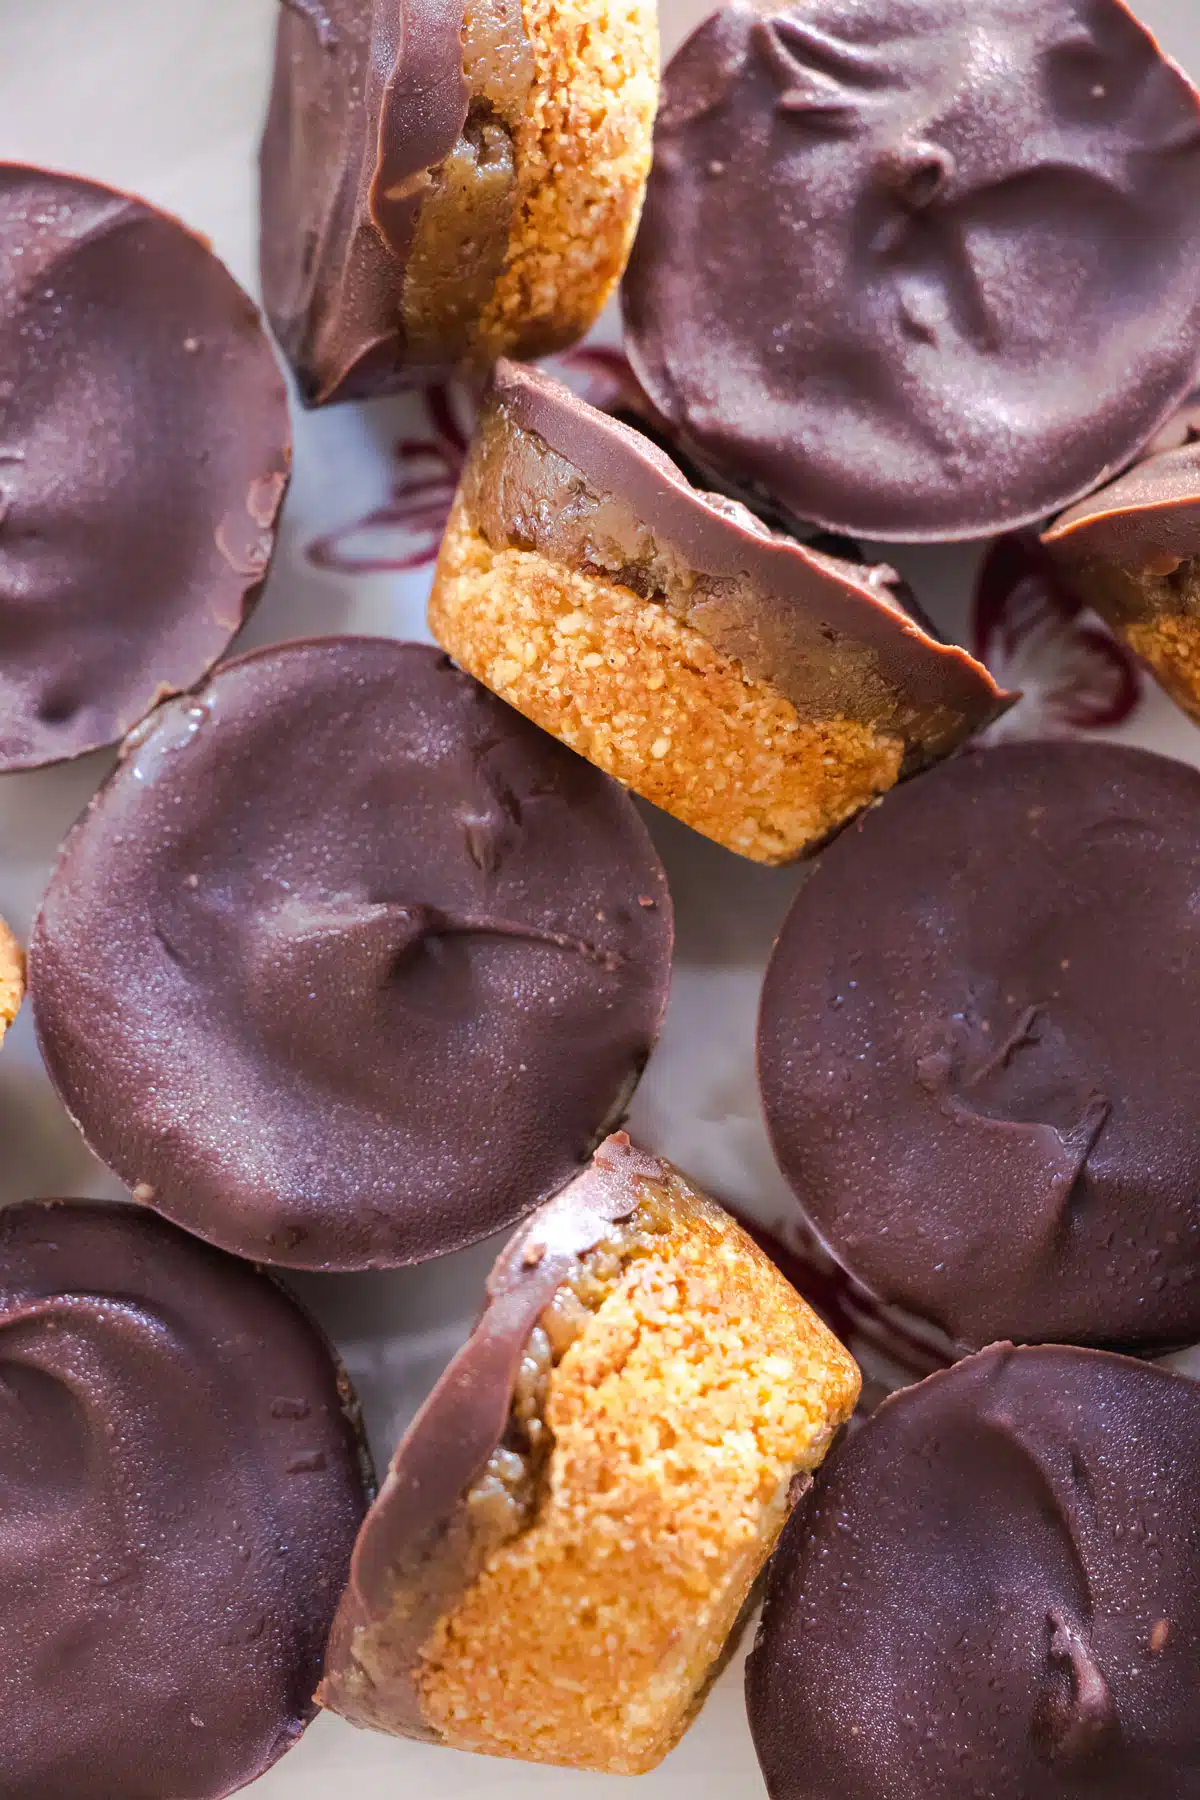
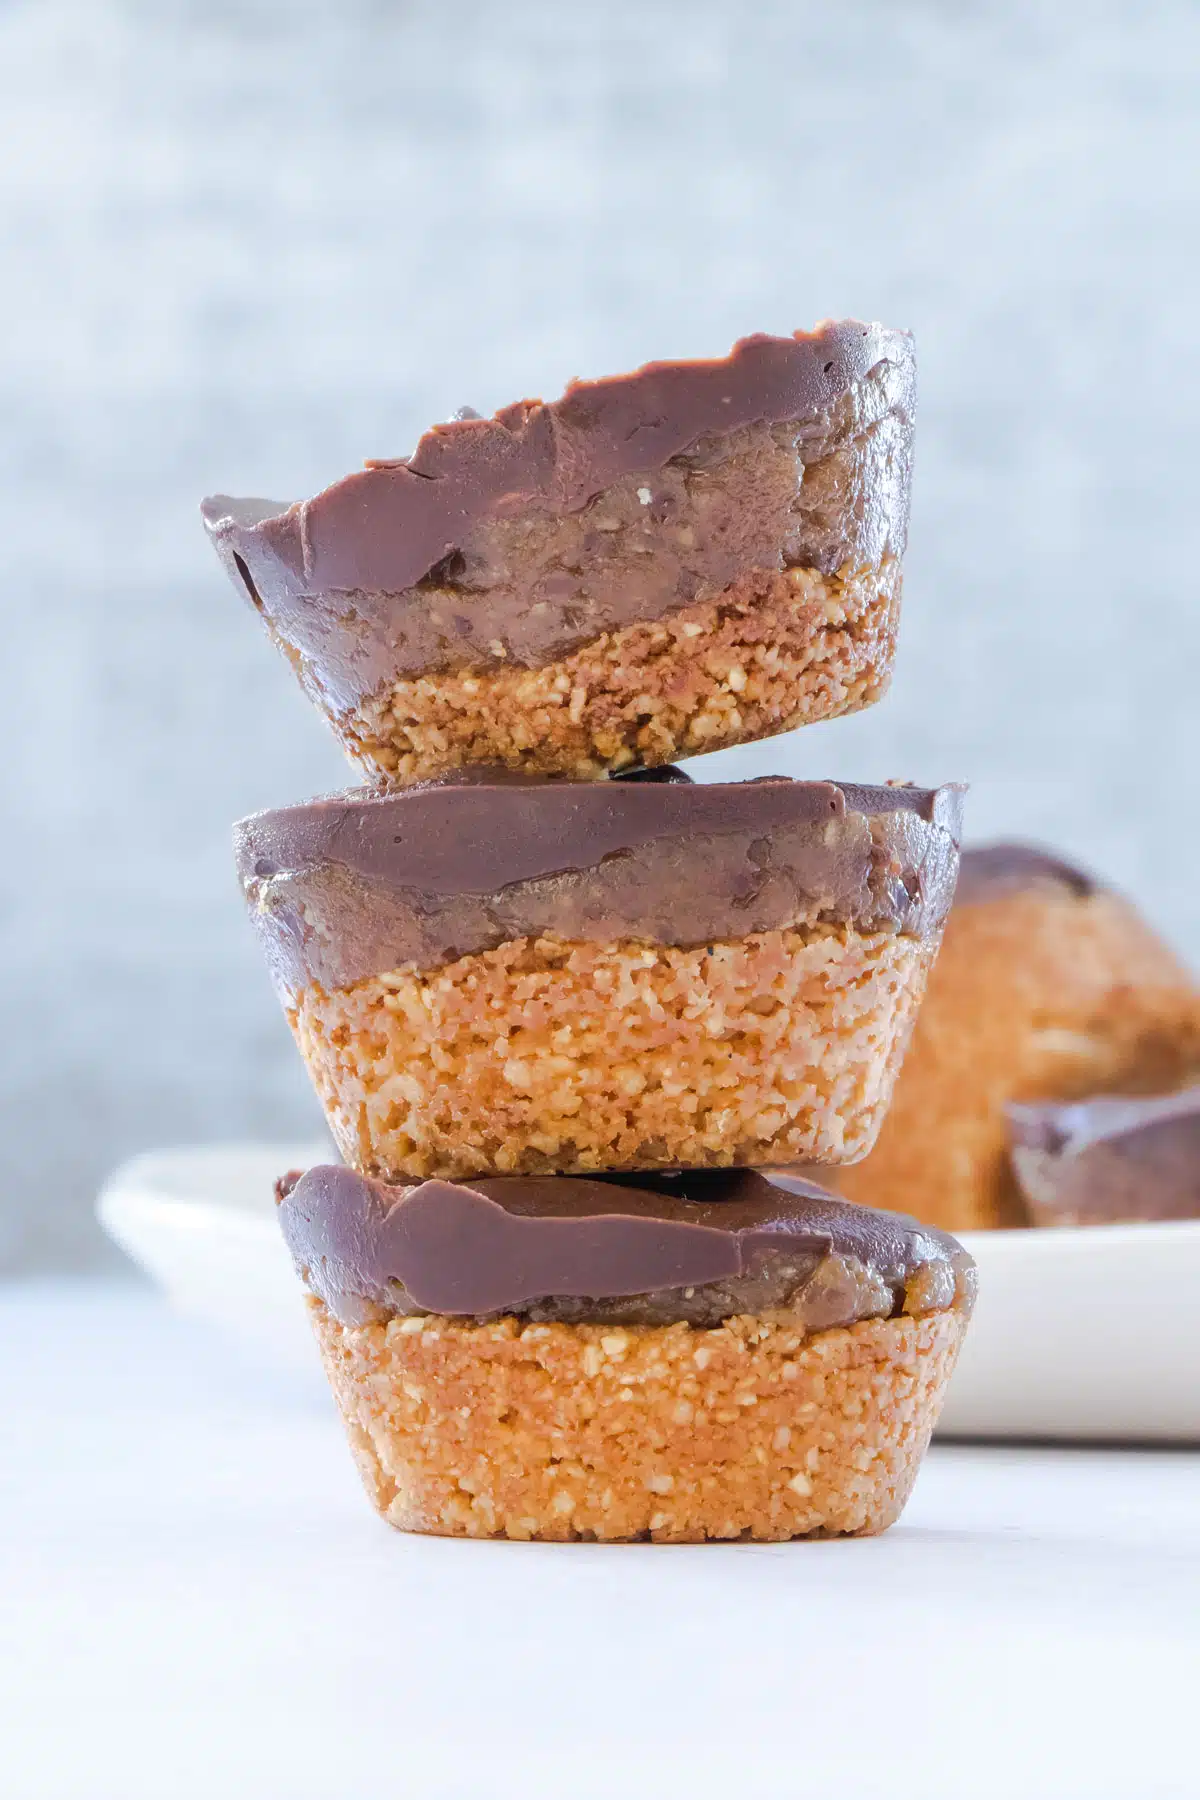
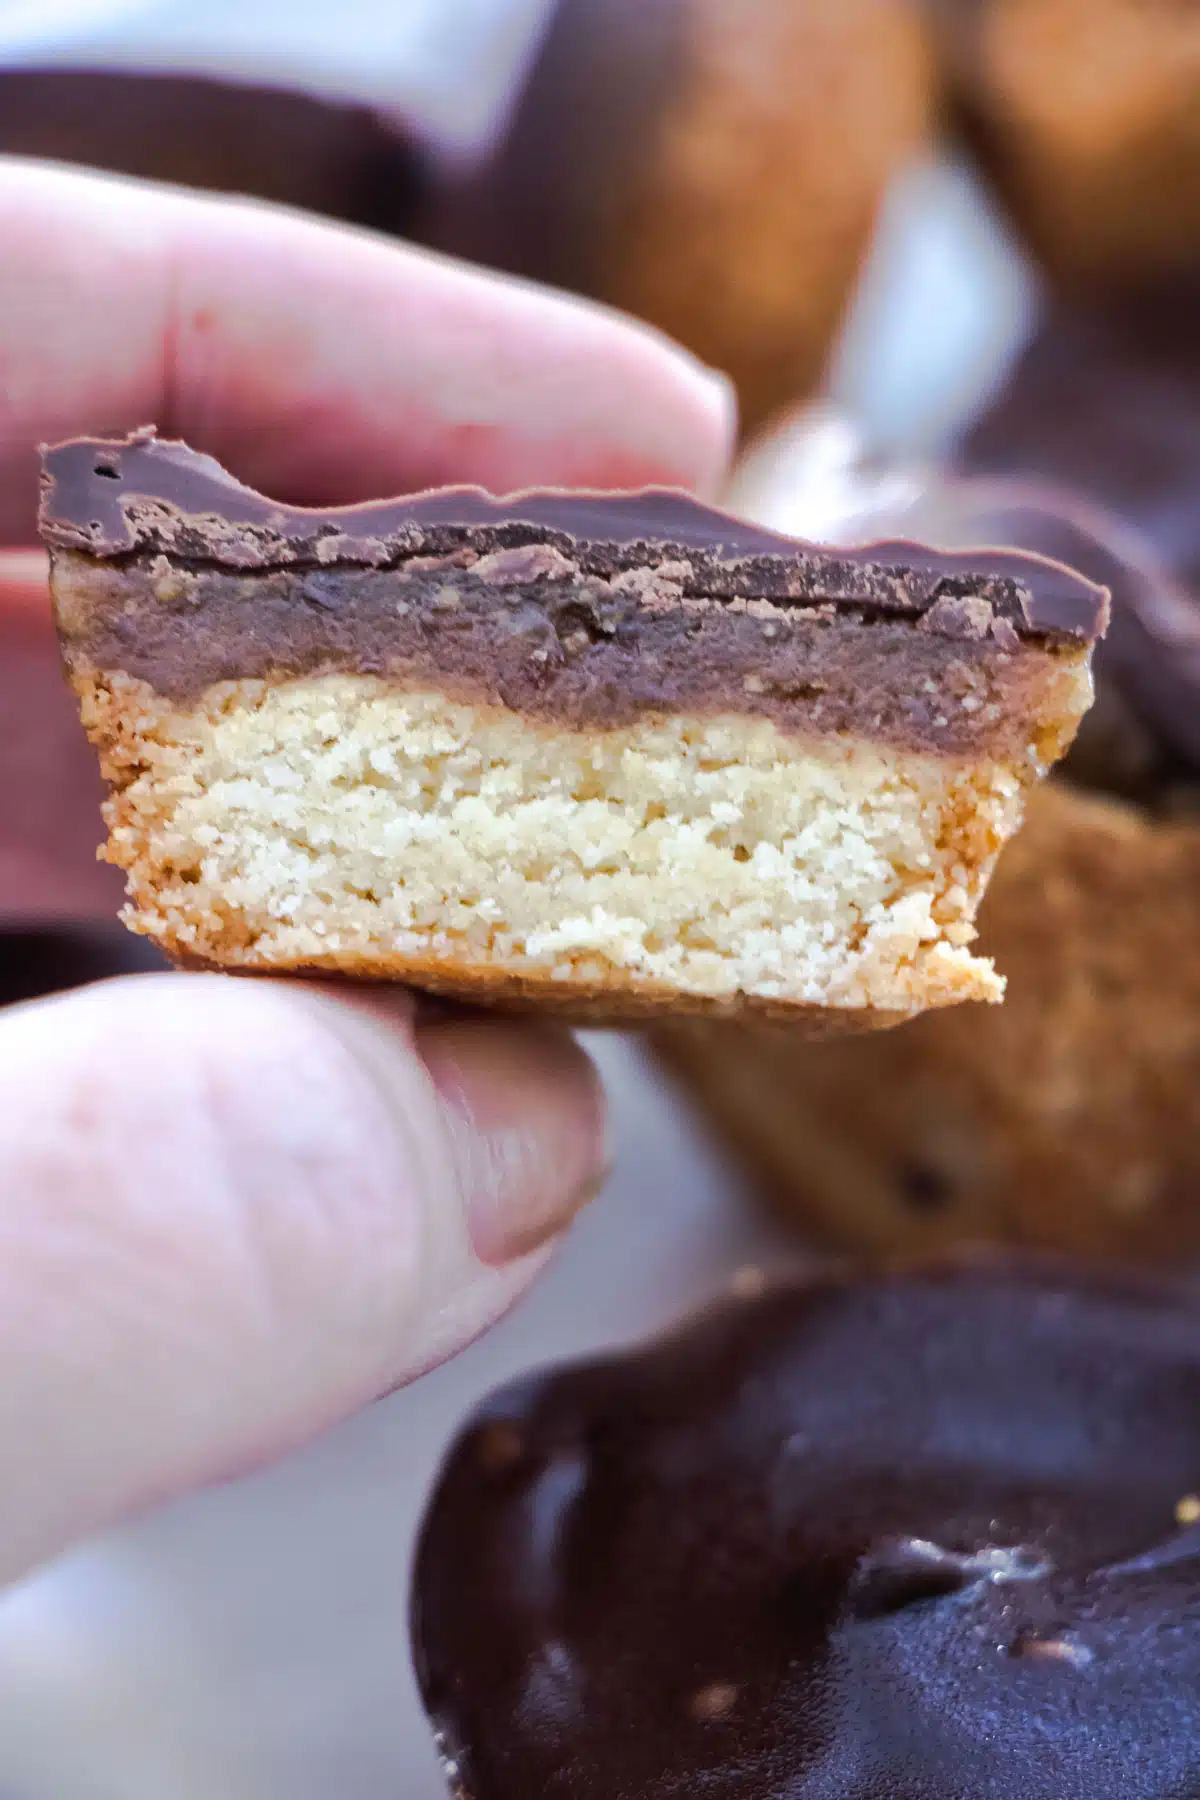
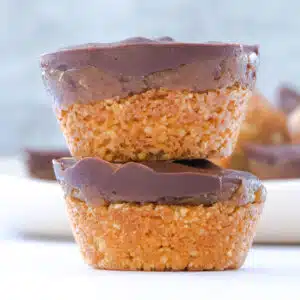
These deliciously irresistible and wholesome Twix Cups have a cookie base, chewy caramel centre, and are topped with chocolate to finish. They’re easy to make and are a filling dessert or snack to enjoy anytime. The recipe is also gluten free and can be made dairy free too.

Key Ingredients
These Twix cups use very basic ingredients you will likely already have in your fridge and pantry. They’re very easy, and relatively quick to make, though there are a few steps to follow. Nothing complex, just a little resting time in the freezer for each layer.

- Almond flour – Used for the base and gives them the cookie crunch you get from Twix.
- Maple Syrup – Adding a little sweetness to the cookie base.
- Coconut oil – Helps to bind the base ingredients and adds a little flavour.
- Vanilla essence – Enhances the flavour of the other ingredients.
- Peanut butter – I’ve used a creamy, smooth peanut butter, but crunchy would also be fine.
- Dates – When combined with the peanut butter these make a delicious caramel-like filling.
- Melted chocolate – Provides the top layer of the cup. It’s not a Twix without chocolate! Go for a dairy free chocolate if needed.
- Salt – to balance out all the sweetness in the recipe.
If preferred, you can swap out the nut butter for any of your choosing. Just note that if you are doing this, it will change the flavour profile of the final result.
Substitutions And Variations
You can use any nut flour you like – just ensure it is a flour and not a meal. Nut meals are generally coarser, denser, and ground with the skin on giving them a brown-ish colour. Nut flour is drier, and finely ground without the skins so the final result is a very pale looking, much fluffier flour.
How To Make These Twix Cups
There are really only few simple steps here. Mix and bake the base, mix and spoon over filling, melt and pour over chocolate. That’s it. After that all they will need is a little time in the freezer so the filling and topping set.

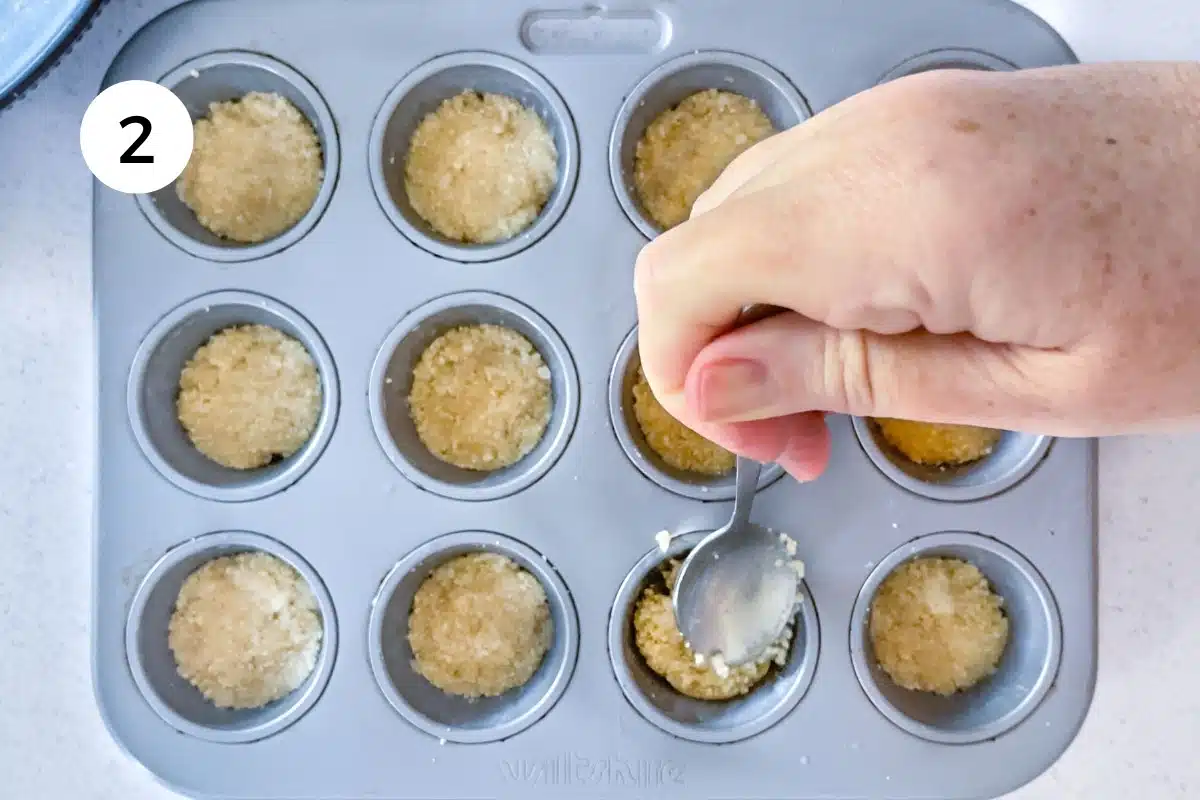

- Preheat the oven to 350ºF/180ºC and grease a 12-hole mini muffin tin with coconut oil.
- Combine the almond flour, maple syrup, and coconut oil along with a pinch of salt. Spoon the cookie base evenly into the muffin tin, then flatten out with the back of the spoon or your fingers.
- Place in the oven to bake for 12 mins or until golden. Remove and set aside to cool completely.
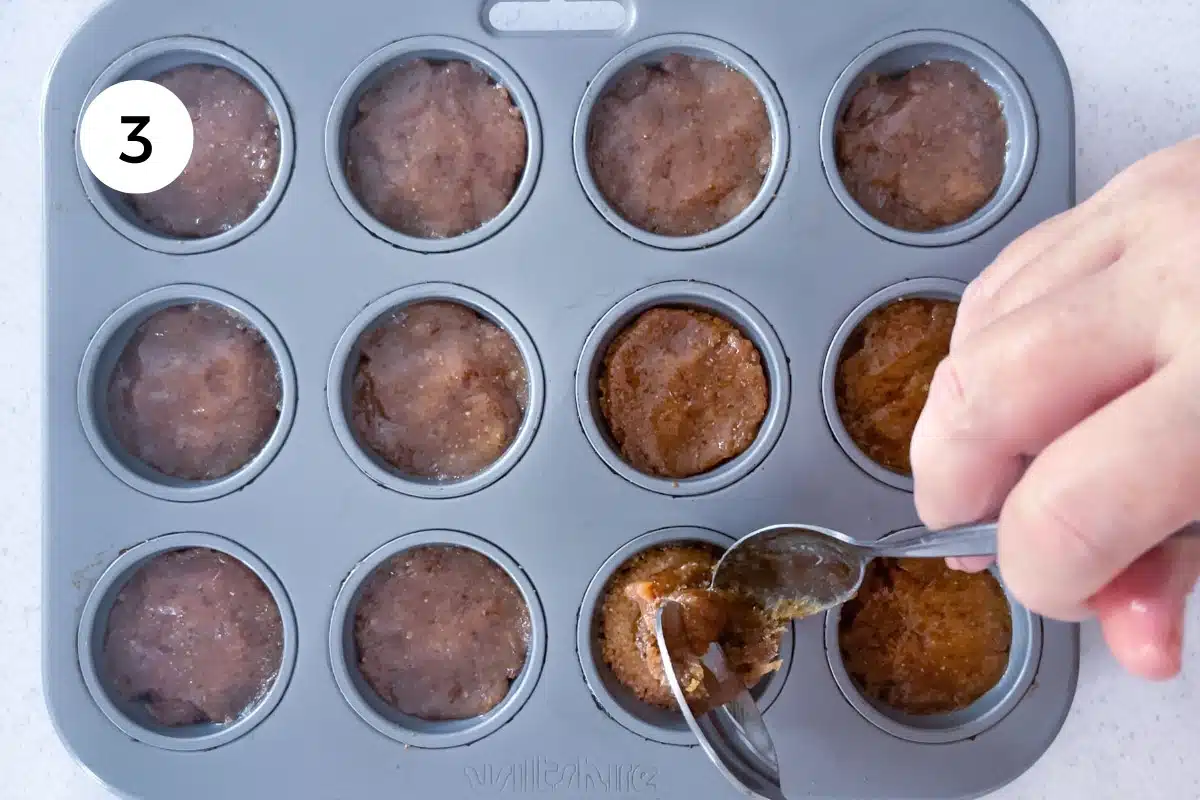
- Add the medjool dates, peanut butter, vanilla, and a tiny pinch of salt to a blender. Blend on high until a ball forms. If the mix isn’t coming together, add 1 tsp plant-based milk at a time until it does. Do this slowly because if it becomes too liquid it won’t set in the freezer.
- Spoon the caramel onto each of the cookie bases and flatten out with the back of the spoon. Set aside while you make the chocolate topping.
- Melt the chocolate and coconut oil over a very low heat then pour this evenly over the 12 Twix cups.
- Move to the freezer and leave to set for 1 hour. Remove, leave to sit for 5 minutes then enjoy! Store any leftovers there in an airtight container.
The component of this dessert that makes these cups taste so like an actual Twix bar is that chewy caramel filling. Getting that right is important so take your time with it. And be cautious not to add too much liquid! Be patient and add a little at a time until a peanut butter/date ball forms.
Tips For Success With This Recipe
The caramel should be very sticky and come together in a ball when it’s done. It shouldn’t not be a spreadable paste. This can happen if too much milk is added and in this case the filling won’t firm up as well in the freezer.
To achieve the ball-like consistency start by blending the base ingredients – if it looks like little pebbles and won’t come together add in 1 tsp of any plant-based milk you like and blend again for a good 20 seconds. If it still looks a bit pebbly repeat the process until a caramel ball you can pick up in your hands is formed. caramel.

Storing And Freezing
Store and leftovers in an air tight container in the fridge or freezer. If they are stored in the freezer, just let them sit on the bench for 5 minutes before digging in. Letting them warm up a touch makes them easier to bite into.
Make Ahead
This is a great make ahead recipe! Make them a day or so ahead of when they’re needed so you have an easy treat on hand.
Twix Cup FAQs
Almond meal is a coarser grind, denser, and ground with the skin on giving it a brown-ish colour. In contrast almond flour is drier, and finely ground without the skins so the final result is a very pale looking flour.
While I haven’t tested any others for this recipe, substituting any nut meal for the almond flour should be fine. You may need to reduce the amount of oil in the base, so start by adding half, then add the rest if needed. This will become apparent if it doesn’t hold together when pressed between your fingers.
More Chocolate Recipes
Did you make this recipe?
If you try this recipe, I’d love to know. Leave a comment, rate it, and remember to tag @wholenaturalkitchen in your pics or reels on Instagram, Facebook or TikTok!
Homemade Twix Cups | From Scratch
Equipment
- 1 Mini muffin tin
Ingredients
Cookie Base Ingredients
- ¾ cup almond flour
- 3 Tbsp maple syrup
- 2 Tbsp coconut oil (melted)
- Pinch of salt
Caramel Filling Ingredients
- ¼ cup smooth peanut butter
- 10 medjool dates (roughly 5oz/150g)
- ½ tsp vanilla
- Pinch of salt
- 1 – 2 tsp any plant-based milk (only if needed)
Chocolate Topping Ingredients
- ½ cup chocolate chips (dark or light – depending on your preference)
- ½ tsp coconut oil
Instructions
For The Cookie Base
- Preheat the oven to 350ºF/180ºC and grease a 12-hole mini muffin tin with melted coconut oil, then set it aside.
- In a medium-sized bowl – mix together the almond flour, melted coconut oil, maple syrup, and pinch of salt. It should all just come together and if you pinch some between your fingers it should stick.
- Spread this mixture out between each of the holes in the muffin tin and push down with the back of the spoon or your fingers to flatten out (see note 1).
- Move to the oven and bake for 12 minutes. They should be golden by this point. If you're oven runs hot though – check them around the 10-minute mark.
- Once done, remove the muffin tin from the oven and set aside to cool.
For The Caramel Filling
- In a blender add in the dates, smooth peanut butter, vanilla essence and a pinch of salt. Blend on high until the mixture starts to come together. If needed – add in a little plant-based milk one teaspoon at a time to help the caramel form. (See note 2 for extra tips to ensure you don't have soggy caramel).
- Scoop the caramel filling over the cookie base in the mini muffin tin. Flatten down so this covers another ⅓ of the muffin hole. It's very sticky so you'll need to do this with your fingers (see note 3).
For The Chocolate Topping
- Add the chocolate chips and coconut oil to a small saucepan and melt over a low heat, stirring constantly. The small amount of coconut oil means the chocolate should be thick but pourable.
- As soon, as the chocolate chips are completely melted, remove from the heat and start spooning the chocolate over the caramel filling. This will take up the last ⅓ of the muffin cup.
- Transfer to the freezer and leave to chill for one hour. This will ensure the caramel filling is firm.
- Remove from the freezer, run a knife down one edge and the Twix cups should just pop out easily. Leave to sit for 5 minutes then enjoy as is or sprinkle with a little extra sea salt. Store any leftovers in an airtight container in the fridge or freezer.
Video
Notes
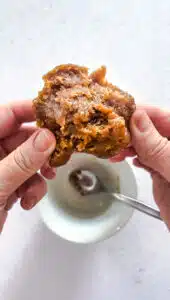 3) You will have caramel left over from this recipe. I find too small a batch just doesn’t work in the blender. Save the leftovers for another batch of cups or roll it into balls and dip it into melted chocolate, chill for 30 mins and enjoy as a separate snack!