Easy Chocolate Bark Recipe | Christmas Edition

This Chocolate Bark Recipe will make an abundance of sweet treats with little effort. It’s the perfect last-minute gift for this time of year since you can make it in one big batch. There’s no need to fiddle around with single serves.

Nutritional Benefits
When discussing the health benefits of chocolate, the focus is often on those found in dark chocolate. However, this recipe was created with the intention of making fun holiday treats for friends and family. So while we do have a little dark chocolate in here, there’s also milk and white chocolate along with some Christmas-themed toppings.
This is the kind of recipe I consider as our 20% foods. That is, 80% of the time we eat deeply nourishing and wholesome foods. We use the remaining 20% to enjoy occasional treats. In my mind, the former nourishes the body, and the latter nourishes the soul, which is just as important.
That said, this recipe is so easy that you can customise it to match your tastes and preferences. If you prefer a dark chocolate version with healthier toppings, it’s simple to do. Check the substitutions and variations section at the end of this article if this is the version you’d like.
Ingredients – What You’ll Need To Make This Recipe
This is a very simple recipe requiring minimal ingredients. Aside from the chocolate, those you choose for the topping can be entirely up to you. I’ve outlined those I used but feel free to experiment!

- Dark chocolate bars, milk chocolate bars and white chocolate bars – or any kind of chocolate flavour of your choosing. Caramel might be another one or used to replace the white chocolate. Just ensure you use different types of chocolate so you get that lovely swirl effect.
- Toppings of your choice – Things like candy canes, shortbread, sprinkles, nuts and seeds are all great.
The type of chocolate you use is up to you and what’s available where you are, however, the quality of chocolate is important. It’s the key ingredient in this recipe so with that in mind choosing a delicious one is essential. Although compound chocolate/cooking chocolate might be cheaper, it’s not ideal for this chocolate bark recipe since no extra sweetener is added. It will give you a very gritty, fatty-tasting bark and we don’t want that. Instead, choose a chocolate you enjoy as a treat or that you’d use for a dessert.

How To Make This Chocolate Bark Recipe
If, like me, you love to give homemade gifts at Christmas, but leave making them to the last minute, this is a great recipe for you! It is SO easy. Melt chocolate, swirl it together, scatter your choice of toppings across the top, chill to firm up, break into bits, and you’re done. Nothing simpler.
- Preheat the oven to 45ºC/110ºF.
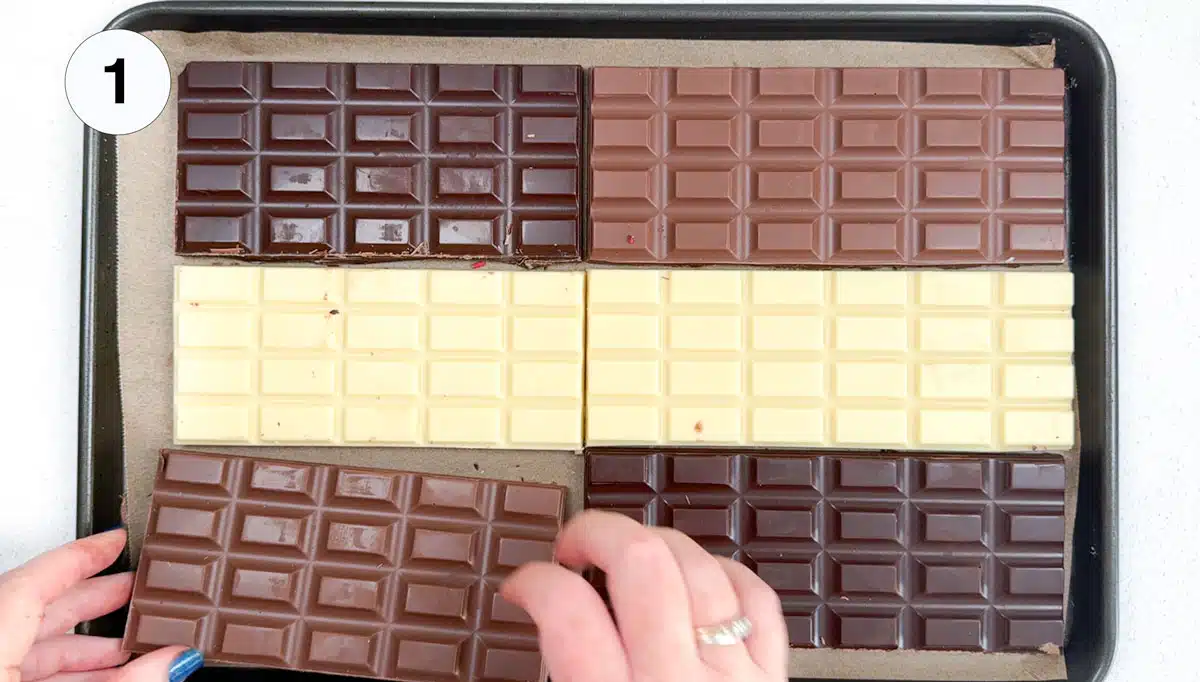
- Line a 28cm/38cm (11 x 15 inch) rimmed baking sheet with parchment paper/baking paper and lay the chocolate out across it. If you have a slightly smaller tray just cut the chocolate to fit. Use any leftover chocolate to make these chocolate covered dates!
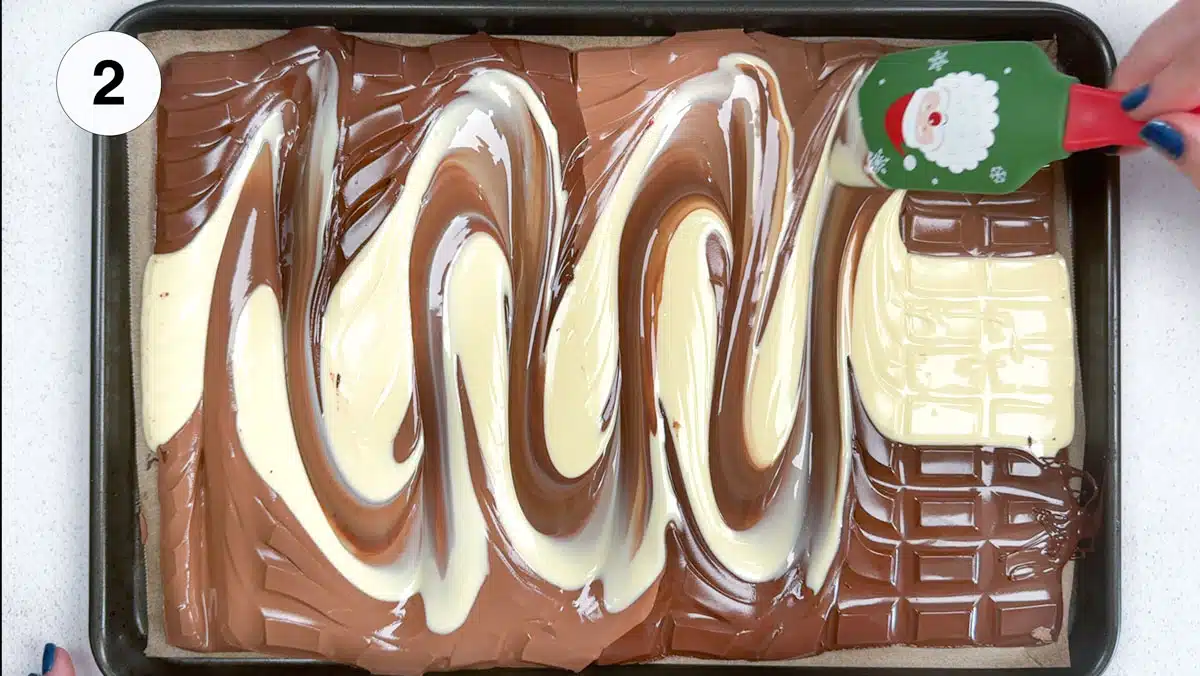
- Put the tray into the oven and leave the chocolate to melt for 10 minutes.
- Remove the tray from the oven and swirl through it with the edge of a rubber spatula.
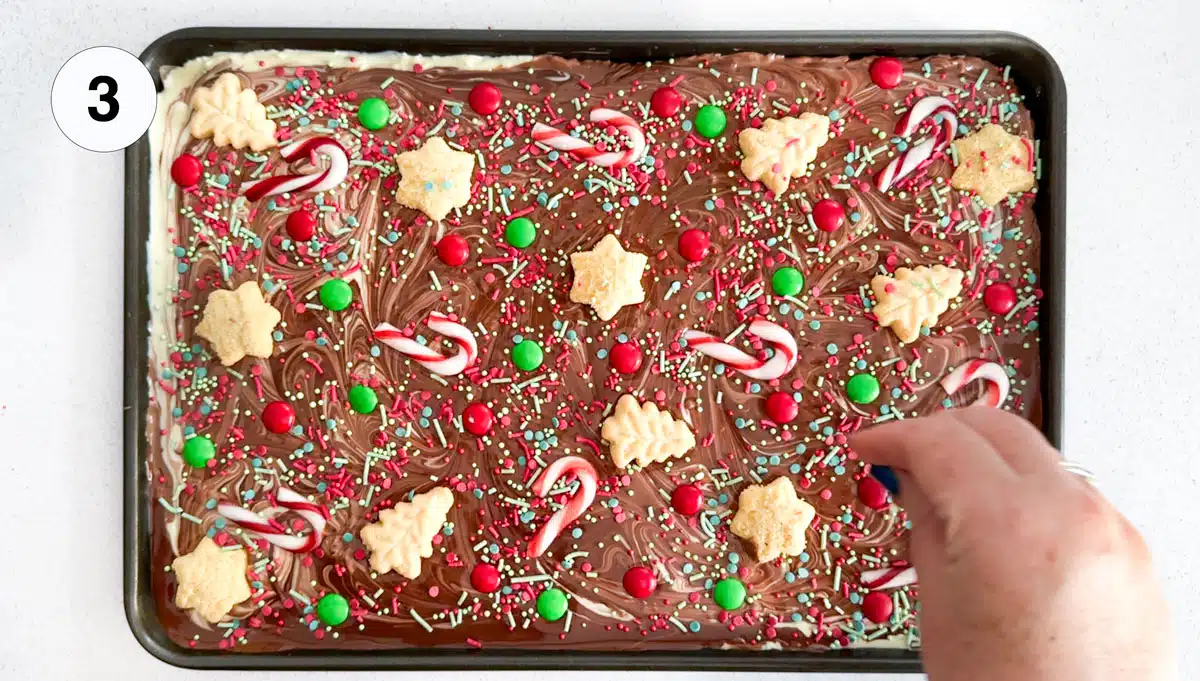
- Next comes the fun part, adding your favorite toppings to decorate! I used mini candy canes, mini shortbread, sprinkles, and Christmas-coloured chocolate buds. These are just suggestions, you can decorate this bark in several different ways using any flavor combinations you like.
- Put the tray in the fridge to firm up. This will take anywhere from 30 minutes to an hour depending on how thick the chocolate was. Just ensure it’s solid before you break it up.
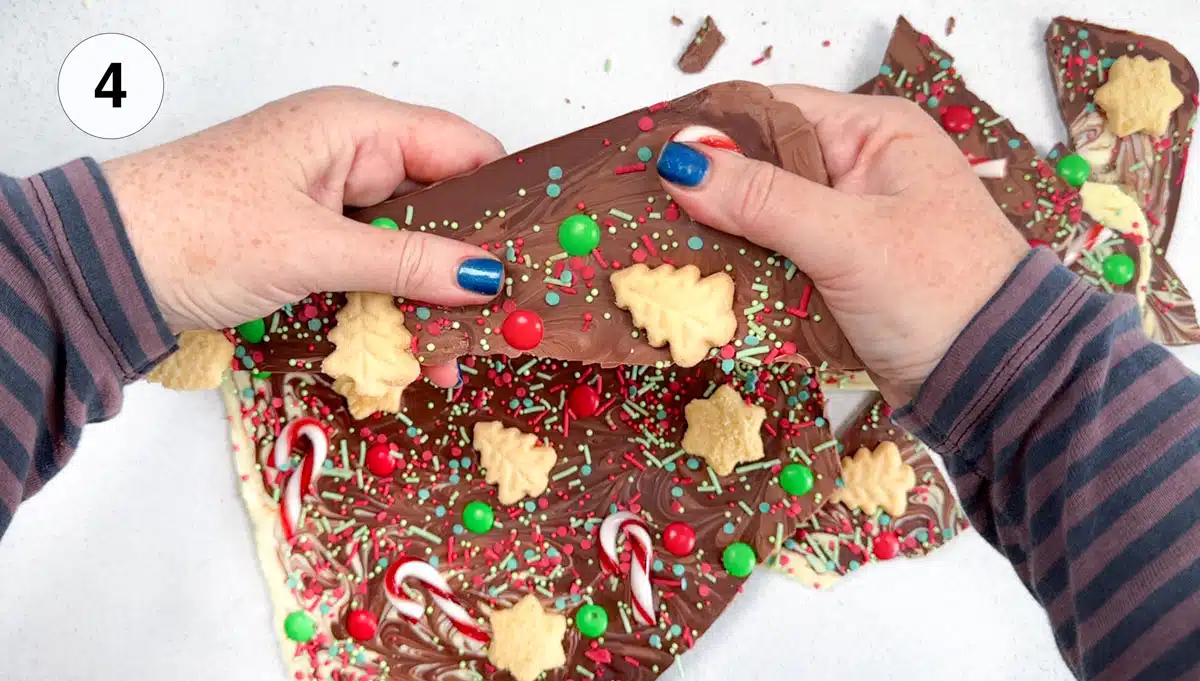
- Once set, break the bark into small pieces or if preferred you can chop it up on a cutting board with a very sharp knife.
A homemade chocolate bark recipe like this one can be as fun and/or nourishing as you want it to be. I’ve gone with a fun holiday season edition, but I’ve given other toppings you might like to use in the substitutions section below.

Substitutions And Variations
Several variations of this recipe can be made depending on the toppings you choose. Once the chocolate is melted absolutely anything will stick to it so let your imagination guide you. You could make it a peppermint bark by adding in a drop or two of peppermint essence before you swirl the chocolate then topping with whole and chopped candy canes. Other toppings could be little marshmallows, freeze-dried strawberries, or crushed nuts.
If you’d like to make this a healthy chocolate bark a few easy substitutions will achieve this. The process for melting the chocolate remains the same but you might make a chocolate almond bark using all dark chocolate, roast almonds and a sprinkle of sea salt. Or make it a dark chocolate bark topped with a variety of things like pumpkin seeds, goji berries, dried fruit, hemp seeds, bee pollen, and coconut flakes. Sprinkle with a little bit of sea salt to finish. This is not only great as a holiday gift but could be used as an easy dessert too.
If you’re after something even more nourishing give this Easy Chocolate Date Bark a go!
Tips For Success With This Recipe
When swirling the chocolates together I recommend using a small spatula because things like a knife tip or a skewer are too fine for the volume of chocolate here. You want something that will move easily through it all. Do use the edge of the spatula though, so you still get definition in the swirl and not a big muddy mess. You can see what I mean in the recipe card video.
Don’t worry if the melted chocolate goes onto the sides of the pan where the parchment paper may not be covering. It will shrink away from the edges in the fridge and the fat content in the chocolate also means it won’t stick.
Make sure the chocolate is completely melted before you attempt to swirl. If your chocolate was very thick it may need an extra few minutes.
Storing/Freezing/Make Ahead
You can make this recipe several days ahead of gifting it. Store it in an airtight container until you’re ready to wrap it up in gift boxes or bags. Don’t leave the bark at room temperature for too long or it will melt.
If you’re making this for yourself and your family it will keep in the fridge for 2-3 weeks. Again, it’s best stored in an airtight container. It could of course be kept much longer than this but some of the toppings can start to lose their flavour. As such it’s best enjoyed while fresh.

FAQs
It makes a great Christmas gift, but you can also enjoy it as an occasional dessert or use it to decorate cakes.
Leaving this chocolate bark out of the fridge for too long will cause it to melt since the chocolate hasn’t been tempered. This requires quite a lengthy process of proper heating and cooling to stabilise the chocolate so it won’t melt at room temperature. I’ve gone with a much simpler option here so this must be kept in the fridge.
It will keep for several months in an airtight container in the fridge, but I recommend consuming it within 2-3 weeks for the best taste experience. Some of the toppings can lose their flavour if left in a cold environment for longer than that.
Other Ideas For Gifts
If you try this recipe, I’d love to know. Leave a comment, rate it, and remember to tag @wholenaturalkitchen in your pics or reels on Instagram, Facebook or TikTok!

Chocolate Bark Recipe | Holiday Edition
Equipment
- 1 large, rimmed baking sheet
Ingredients
- 14 oz dark chocolate (400g)
- 14 oz milk chocolate (400g)
- 14 oz white chocolate (400g)
- 10 mini candy canes
- ⅓ cup green and red chocolate buttons
- ¼ cup Christmas-coloured sprinkles
- 3 oz mini shortbread pieces (80g)
Instructions
- Preheat the oven to 110℉/45℃ (see note 1).
- Line a 11 x 15-inch (28cm/38cm) rimmed baking sheet with parchment paper/baking paper and lay the chocolate out across it. If you have a slightly smaller tray just cut the chocolate to fit. Any leftovers can be used to dip strawberries or dates in chocolate!
- Put the tray into the oven and leave the chocolate to melt for 10 minutes. If your chocolate was very thick it may need a few more minutes. Just check at the 10 minute mark and put it back in for 2-3 more if it needs it.
- Remove the tray from the oven and swirl through it with the edges of a rubber spatula.
- Next comes the fun part, adding your favorite toppings to decorate! I used mini candy canes, mini shortbread, sprinkles, and Christmas-coloured chocolate buds. These are just suggestions, you can decorate this bark in several different ways using any flavour combinations you like.
- Put the tray in the fridge to firm up. This will take anywhere from 30 minutes to an hour depending on how thick the chocolate was. Just ensure it’s solid before you break it up.
- Once set, break the bark into small pieces or if preferred you can chop it up on a cutting board with a very sharp knife.
- Add to gift bags or boxes for gifting (see note 2) or store for yourself in an airtight container in the fridge.
Video
Notes
Nutrition
Pin This Recipe For Later


Gabby Campbell
Gabby is a degree qualified Naturopath/Nutritionist (BHSc Nat) and published health writer. After many years in clinical Naturopathic practice, she moved to recipe development and online education to combat the abundance of misinformation about food and health online. Every recipe Gabby creates is shaped by her clinical knowledge. All use simple, everyday ingredients and many cater to common dietary needs like being gluten-free and dairy-free. MORE ABOUT GABBY
THIS STUFF IS DANGEROUS!! I made a batch yesterday and I’m definitely going to be making another one tonight ahead of Christmas lunch tomorrow because there’s none left!
I’m such a sucker for chocolate + the peppermint candy canes too, so I went hard on those!!
Delish, and easy peasy!! Merry Christmas!!
So glad you enjoyed it Lisa! I usually make several batches too because it goes so fast. Merry Christmas to you too!
This is so delicious and will look really pretty on my Christmas dessert table! The recipe is easy to follow and using good quality chocolate is key. I did a trial run and it was demolished! Fresh batch for Christmas to be made now.
Thanks for this awesome recipe!
I’m so glad you enjoyed it! It’s my favourite thing to make at Christmas. A set and forget that gives you gifts for lots of people all in one go too.
Loved this one!
Glad you enjoyed it!
Lol. Pretty important to use shortening or butter to melt chocolate. No wonder this turned out ridiculous! What a waste!
Hi Liv, the only reason you would add shortening, butter, or any other oil to chocolate is to thin it out. That’s great when you want to coat things easily, like strawberries, but it’s not helpful in a recipe like this. You simply need to melt the chocolate so it can be swirled, you in no way want to thin it out. You’d lose that luscious rich chocolate flavour and introduce that of an oil. I’ve specifically said in the post 10 mins may not be enough for every oven so adding a few extra minutes can help get it to the melted consistency needed for swirling. No shortening or butter necessary.
I’ve never used butter or anything else to melt with chocolate! If you use a good quality chocolate there is no need. I think this recipe is amazing and it is delicious.
Oh I’m surprised this didn’t work for you. I’ve made it SO many times without fail and everyone who’s received it loves it – I’m always asked to bring it 🤣 Did you read the FAQ? Perhaps if you haven’t cooked this way with chocolate before, you could ask for some pointers – I always get a fast response on this site.
My chocolate didn’t melt properly! I used cheap supermarket own brand chocolate for my first attempt to see how it went – I was in over 10mins and the white chocolate just didn’t melt properly. Maybe it needed longer😬. It’s gone lumpy as opposed a nice swirled design.
Hi Natalie – I hope that means you didn’t lose the whole batch! I had this happen in one of the tests I did before publishing the recipe, but found an extra 3 minutes in the oven did the trick. I wrote that in (the extra 2-3 mins if needed) to try and avoid anyone having the same problem so I’m sorry you’ve experienced it. The lumpiness tells me it wanted a little more melting. If you’re game to try it again – and use the same chocolate I really do recommend giving it that little bit of extra time to get the chocolate silky smooth.
I am confused. My bars of chocolate are 4 oz each. It looks like you layer two bars each for milk chocolate, dark chocolate and white chocolate. That is a total of 8 oz per each of those three chocolates. Is there more than one layer of chocolate on the parchment paper?
Hi Kathy – I’m not quite sure where the 4oz has come from? The recipe lists 14oz/400g of each chocolate. I had 2 x 7oz/200g bars of each kind (milk, dark, & white). Is the recipe showing as 4oz for you?
What kind of chocolate do you use in this bark ?
Hi Kelly – Any chocolate at all you like is completely fine. I used 2 bars each of milk, dark, and white Belgian chocolate in the pics/video for this recipe. I purposely haven’t mentioned brands so that people who aren’t in Australia don’t go looking for something they can’t find. The most important thing is that the chocolate you choose tastes great so if there’s a brand of chocolate you like or buy often that will be perfect. My only caution is not to use compound/cooking chocolate you find in the baking aisle at the supermarket because they have a fatty and gritty mouthfeel.